Gibson Assembly - what's that?
Summary
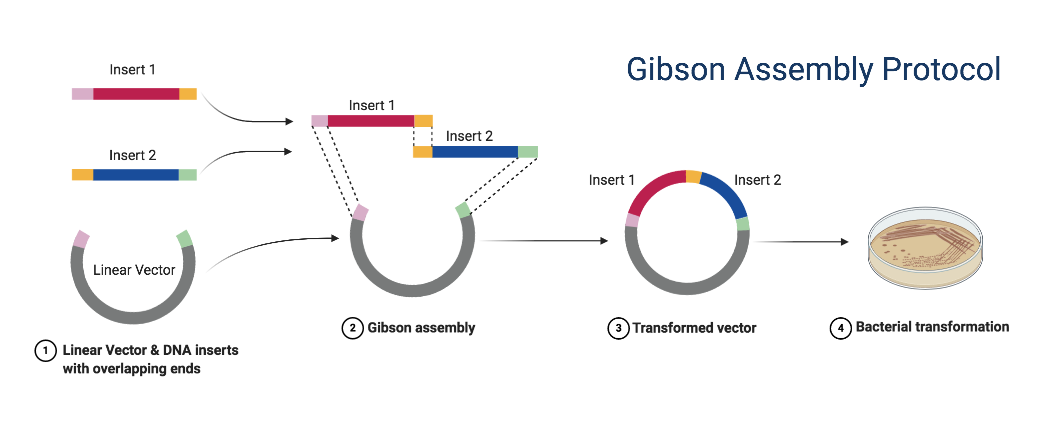
In 2009 Dr. Daniel Gibson and colleagues at the J. Craig Venter Institute developed a novel method for the easy assembly of multiple linear DNA fragments (Nat Methods 2009;6(5):343-5). Regardless of fragment length or end compatibility, multiple overlapping DNA fragments can be joined in a single isothermal reaction. With the activities of three different enzymes, the product of a Gibson Assembly is a fully ligated double-stranded DNA molecule. This has proven to be an efficient and effective method for the assembly of plasmids, and molecular biologists now use this method extensively.
Why Gibson Cloning?
- No need for specific restriction sites. Join almost any 2 fragments regardless of sequence.
- No scar between joined fragments.
- Fewer steps. One tube reaction.
- Can combine many DNA fragments at once.


Procedure
- Design your plasmid and order primers (see figure to the right).
When designing your plasmid, think about what DNA segments you will need to join to create your final plasmid. Adjacent segments should have identical sequences on the ends (sequences A and B in the figures). These identical sequences can be created via PCR with primers that contain a 5′ end that is identical to an adjacent segment and a 3′ end that anneals to the target sequence.
One strategy is to order primers that are 60 bp long, with 30 bp matching the end of the adjacent fragment and 30 bp annealing to the target sequence.
Avoid strong secondary structures in the homology region. Hairpins in this region can significantly reduce the efficiency of two homologous ends annealing.
- Generate DNA segments by PCR.

- Run PCR product on an agarose gel to check for size and yield. If there are significant amounts of undesired product, gel purify DNA segments. Otherwise PCR purification or even the raw PCR mix can work fine in an assembly if you want to save time.
- Combine segments in Gibson Assembly Reaction. Note: Yields will be best when the the DNA fragments are present in equimolar concentrations.
The Gibson Cloning Master Mix consists of three different enzymes within a single buffer. Each enzyme has a specific and unique function for the reaction:
- T5 Exonuclease - creates single-strand DNA 3’ overhangs by chewing back from the DNA 5’ end. Complementary DNA fragments can subsequently anneal to each other.
- Phusion DNA Polymerase - incorporates nucleotides to “fill in” the gaps in the annealed DNA fragments.
- Taq DNA Ligase - covalently joins the annealed complementary DNA fragments, removing any nicks and creating a contiguous DNA fragment.
Incubate the mix for 1 hour at 50°C or follow manufacturer's instructions. You can purchase master mix from a company (e.g. NEB or SGI-DNA), or make your own (ex: Miller Lab Protocol).
- Transform the DNA into bacteria and screen for the correct plasmid product by Restriction Digest.
- Sequence the important regions of your final plasmid, particularly the seams between the assembled parts.
Tips and FAQ
Tip: Primer Design
Design primers to split an antibiotic resistance gene to effectively create an extra part (one part has half of the antibiotic gene, the adjacent part has the other half). Any colonies should have at least the correctly assembled antibiotic gene. This is a nice trick that can cut down on background and enrich for correctly assembled plasmids. This trick can also enable replacement of "inverse PCR" reactions with a 2-part Gibson if you're only making a small change in a plasmid (such as point mutations).
Tip: “Stitching” Fragments Together using Oligos
When you need intervening sequence between two PCR products, one method is to “stitch” together several oligos. This technique is especially useful for introducing promoters, terminators, and other short sequences into the assembly and is used when the part to be inserted is too long to include on overlapping PCR primers (>60 bp) but too short to make its own part (<150 bp).
Please note that the way to design the “stitching” primers and the amounts of them to include in the Gibson reaction are different than with normal PCR primers. The details are published in ( Nat Methods 2010; 7:901-3 ).
Tip: Number of Fragments Assembled Simultaneously
Multiple fragments can be assembled in one reaction. However, some labs have observed a sharp decrease in success rate when assembling more than 5 fragments at a time.
References
- This webpage was created in collaboration with Felix Moser, a graduate student at MIT.
- SGI-DNA, a Synthetic Genomics company, offers multiple Gibson Assembly Reagents as both kits and master mixes, including the Gibson Assembly® Ultra, a two step method for up to 15 fragments, or the Gibson Assembly® HiFi, a single step method for up to 5 fragments.
- SGI-DNA has released a PDF Guide to Gibson Assembly.
- New England Biolabs sells DNA Assembly kits, including NEBuilder HiFi and Gibson Assembly. NEB has other resources, such as a primer design tool. Gibson Assembly® is licensed to New England Biolabs by Synthetic Genomics, Inc.
- OpenWetWareJanet Matsen has assembled a guide to Gibson Assembly
- Miller LabSamuel Miller's lab provides detailed protocols and buffer information